1 · How Khorlo works
| Part | What it does |
|---|---|
| String | One of eight sound sources placed around the cylinder. Pitch is relative to the key you play. Position sets when a plucker reaches it. Each string can use a String, Beam, Bell, Bowl, Membrane, or Plate resonator. |
| Plucker | A ring with a contact point that travels around the cylinder. Rate sets its speed. Each of the eight pluckers can run at a different rate and strike a different selection of strings. |
| Exciter | The shape of the strike. Change it to make the attack sharper, rounder, or noisier. |
| Voice | One note, with its own eight strings and pluckers. At the voice limit, a new note replaces the oldest held note. Set the limit in AMP. |
The cylinder itself doesn't move. The contact points move at the rates you set. A plucker at 2 Hz crosses eight evenly spaced strings sixteen times a second. Move a string to change its timing. Add a second plucker at another rate to create an overlapping rhythm.
The four pages
| SYNTH | Pluckers on the left, strings on the right, and the 3D view between them. Macros, modulation, AMP, and the two voice filters sit along the bottom. |
| EFFECTS | Ten effects applied to the combined output. Drag them to change their order. |
| ROUTING | All modulation routes in one table. Edit sources, destinations, amounts, polarity, and velocity influence here. |
| PRESETS | Browse, save, and organise presets using folders, tags, and favourites. |
The top bar has the ☰ menu, preset name, previous/next preset arrows, SAVE, and the master volume knob. Hover over a control to see its description in the preset-name area. You can turn this help off under ☰ › Control descriptions.
In your DAW, send Khorlo MIDI notes to play it. Tempo-synced controls follow the host's clock. The download is VST3, AU, and CLAP. There is no standalone app.
Editing the 3D view
The view shows string vibration and plucker movement while notes sound. You can edit the instrument directly:
- Drag a plucker ring vertically for Height or sideways for Offset.
- Drag its bright start marker sideways for Rate or vertically for Strength.
- Drag a string's head around the cylinder for Position. Drag its wire vertically for Pitch.
- Hold Alt while adjusting Position or Offset to snap to eighths of a revolution.
P1 has no Offset and S1 has no Position. They stay at the reference position. The 3D handles also accept modulation cables.
2 · Your first sound
The first-run tour walks through the main controls. Open it again from ☰ › Getting started, or try this:
- Open PRESETS and click INIT to reset the patch. Return to SYNTH.
- Hold a MIDI note. P1 starts moving and strikes S1.
- Click the S2 tab to turn on a second string. Its different Position adds another strike to the loop.
- Adjust S2's Pitch and Position to change its note and timing.
- Move P1 Rate to speed up or slow down the pattern.
- Choose an exciter shape from the buttons on the outer edge of P1. Listen to how the attack changes.
- Raise Rate further to try a sustained tone. Lower Strength if you want a lighter sound.
To reach the extra controls, click the arrow beside the P or S bank tabs. It expands all four visible cards in that column. Click it again to close them.
3 · Pluckers
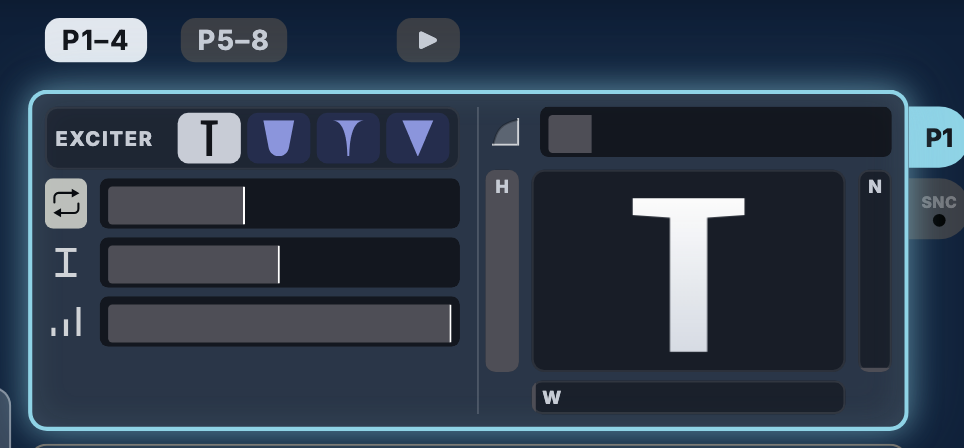
The left column shows four plucker cards at a time. Use the P1–P4 and P5–P8 bank tabs to switch sets. Click a numbered card tab to turn it on or off. Shift-click to solo it.
| Control | What it does |
|---|---|
| Rate | Revolutions per second, from 0.05 to 64 Hz in free mode. Higher rates move from separate plucks to sustained textures. Modulation can extend the rate beyond the slider's range. |
| Height | Where along the string the plucker strikes. Lower is rounder, higher is brighter. |
| Strength | Strike force. Higher settings are louder and brighter, with more saturation. It also controls the strength of bowed sustain. |
| Offset | The contact point's starting position around the cylinder. Use it to shift a plucker's timing relative to the others. P1 has no Offset. |
| Attack | Softens the start of the strike. Raise it for a gentler attack. |
Choosing which strings to strike
The eight numbered buttons at the bottom of each card select the strings that plucker can strike. All eight are enabled by default. Click a number to skip that string.
Try sending P1 to strings 1 and 2, and P2 to strings 3 through 8. Give the pluckers different rates for a slow bass pattern and a faster top line. A string must also be switched on to sound. Locked pluckers share this selection.
Loop and once
Click the icon beside Rate to choose loop or once. Loop repeats while the note is held. Once travels one revolution per note and stops.
Free, tempo, and linked rates
Click SNC beside a card to cycle its rate mode. P1 offers Free and Tempo. P2–P8 also offer LNK.
- Free: Set Rate in hertz.
- Tempo: Choose a beat division. Click the rate field, scroll over it, or right-click to type a division. Each division sets the length of a full revolution. At 1/4 with eight active strings, one revolution produces eight strikes per quarter note.
- LNK: Set a ratio of P1's rate. Ratios read P1:this plucker. A 4:1 ratio runs at one quarter of P1's speed. 1:8 runs eight times faster.
Exciter shapes
Choose from the five buttons on the outer edge of the card:
| Impulse | A sharp, bright strike. |
| Half-sine | A rounder strike, like a soft mallet. |
| Exp | A fast attack with a short decaying tail. |
| Saw | An asymmetric, buzzy strike. |
| Noise | A burst of noise. This is the default exciter. |
The exciter pad
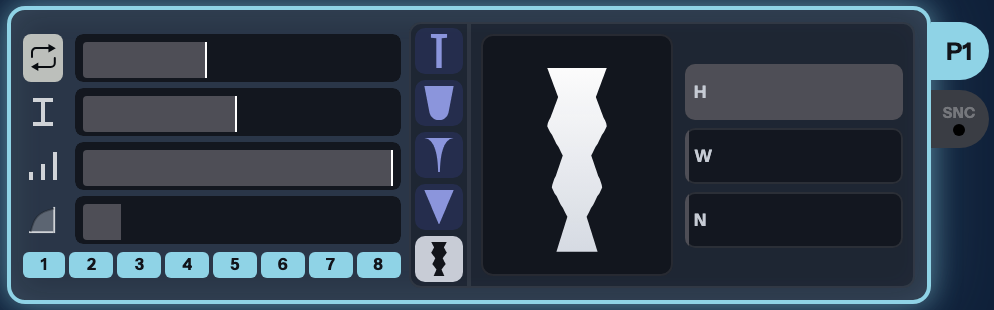
The pad shapes the strike itself, and most of a sound's character is decided here. Drag inside it, or use the H, W, and N sliders beside it, which set the same three values in the same order:
| Hardness | Drag up for a harder striker. Higher Hardness gives a brighter strike. |
| Contact Width | Drag right to widen the contact. A wider contact softens the top end. |
| Noise | Right-drag to add noise to any exciter shape, including Noise itself. |
Right-click a slider to enter an exact value. Shift-drag inside the pad for finer changes.
4 · Strings
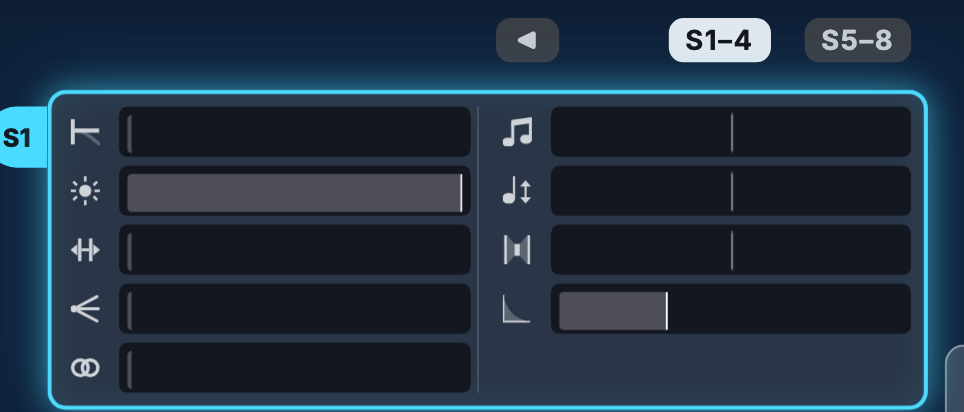
The right column works like the plucker column. Switch banks with S1–S4 and S5–S8. Click a numbered tab to turn a string on or off, or Shift-click to solo it.
| Control | What it does |
|---|---|
| Pitch | Tunes the string up to 24 semitones above or below the played note, in semitone steps. Every string, including S1, is tuned relative to your MIDI note. |
| Detune | Adds a fine offset of up to one semitone either way. Small differences between strings create beating and an ensemble sound. |
| Pan | Places the string in stereo. Strings start centred. |
| Position | Places the string around the cylinder and changes when pluckers reach it. S1 is fixed at the reference position. |
| Wash | Makes repeated strikes blend into a sustained wash. Higher settings reduce each new strike according to how strongly the string is already ringing. |
| Decay | Sets the string's ring time. The slider reads about 0.05 to 3 seconds. The resonator, pitch, and damping also affect the tail. |
| Level | Sets this string's volume, from silence to +6 dB. The vertical fader is beside the resonator buttons. Double-click for 0 dB. It also accepts modulation. |
Expanded controls
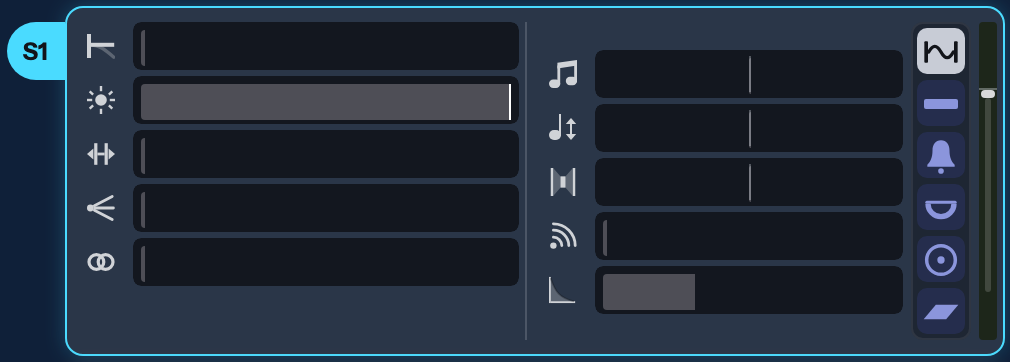
| Stiffness | Stretches the overtones apart. Small amounts add a piano-like or metallic character. Larger amounts can sound bell-like. |
| Brightness | Controls how long the high frequencies survive. Low settings sound muted. High settings let the top end ring. |
| Drive | Adds saturation. On strings, strong attacks can start sharp and settle as the sound decays. The other resonator types saturate without this pitch bend. |
| Spread | Detunes the second resonating body by up to a semitone. It only affects the sound when Coupling is above zero. |
| Coupling | Adds a second resonating body for a doubled, beating sound. Set Coupling first, then adjust Spread. This increases CPU use. |
Coupling and Spread work within one string. They do not couple separate strings or set stereo width. Use Pan to position strings in stereo.
Resonator types
The six buttons on each string card select its resonator:
| String | A modelled plucked string. The default. |
| Beam | A struck bar with widely spaced overtones. Try it for mallet sounds. |
| Bell | A bell with a low hum and a cluster of ringing overtones. |
| Bowl | A singing bowl with widely spaced partials. |
| Membrane | A drumhead for tuned and noisy percussion. |
| Plate | A dense metallic sound with closely spaced partials. |
The controls stay available for every type. On the five non-string resonators, Stiffness changes the spacing of the partials, Decay controls their ring times, and Coupling adds detuned copies whose tuning is set by Spread.
5 · Gestures and locking
| Gesture | Action |
|---|---|
| Drag | Adjust a control. |
| Shift-drag on a P/S slider | Adjust the property across all eight pluckers or strings, keeping their relative offsets until a value reaches its limit. |
| Shift-drag on other controls | Fine adjustment on AMP, filter, and effect knobs, the exciter pad, and the 3D handles. |
| Alt-drag | Snap Position and Offset to eighths of a revolution. |
| Double-click a value control | Reset it. Most sliders return to the middle. Exciter controls return to neutral, string Level and effect trims to 0 dB, and limiter Input to 0 dB. |
| Right-click a value control | Enter an exact value. The exciter pad uses right-drag for Noise instead. |
| ⌘ / Ctrl-drag | Adjust modulation depth on a modulated control. |
| Mouse wheel on Rate | Step through tempo divisions or linked ratios. |
Arrow keys depend on what you are editing. See Keyboard shortcuts.
Tab menus
Right-click a tab for these actions:
| Numbered P or S tab | Turn on/off, Solo, Copy, Paste, Paste to all, Lock, Randomise, and Reset. |
| P or S bank tab | All on, All off, Only the first, Spread evenly, Randomise all, Unlock all, and Reset all. These actions cover all eight cards. |
| MOD tab | Copy, Paste, Clear destinations, and Reset. |
Paste to all keeps each string's Position or plucker's Offset. To distribute the positions evenly, choose Spread evenly from the bank menu.
Locking cards together
Right-click a numbered tab and choose Lock to…. The tab gains a padlock with the other card's colour. Editing either card updates the shared properties on both.
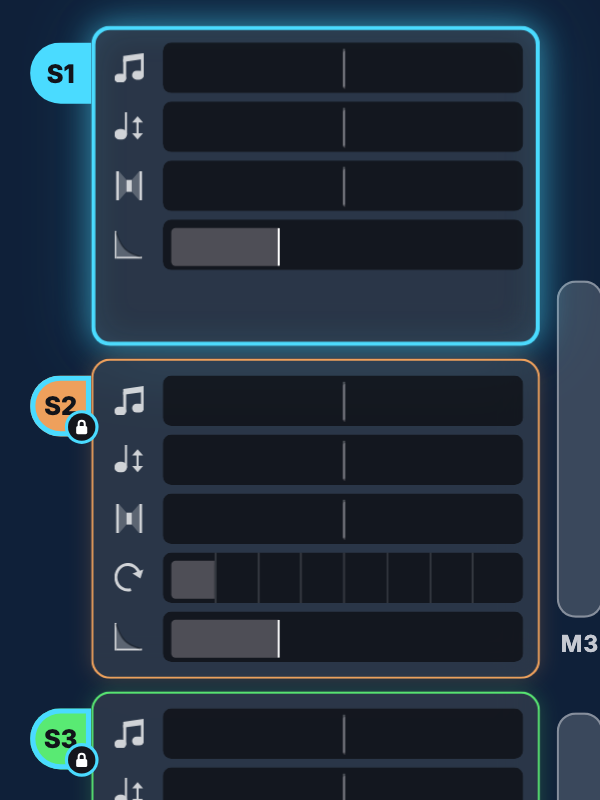
- Locked pluckers keep separate Offsets.
- Locked strings keep separate Pitches and Positions.
- On/off remains independent for every card.
You cannot lock another card to a card that is already following one. Choose Unlock from its menu to separate it, or Unlock all from the bank menu.
6 · Modulation and macros
MOD1–MOD6 use shapes you draw. Each holds up to six destinations. MOD7 and MOD8 use incoming controls such as velocity, macros, and MPE expression. Each holds nine slots, with a separate source and destination per slot. Both offer the same sources.
Assigning modulation
Drag a MOD tab onto the control you want to move. Available targets light up as you drag. You can route to P and S sliders, exciter controls, AMP and filter knobs, effect knobs, and 3D handles.
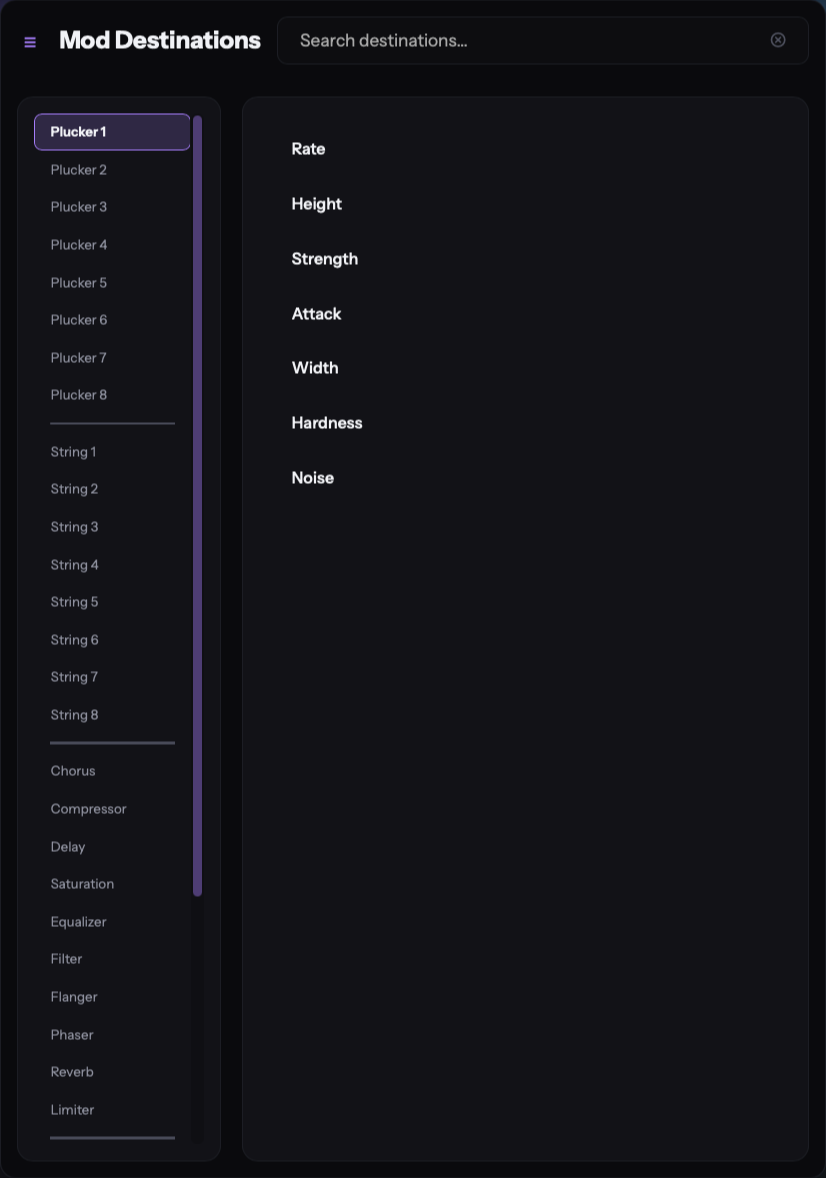
You can also click a destination slot to open the Mod Destinations picker. Browse its groups or search for a control by name. Click a filled slot to change its destination.

| Amount | How far the route moves the control. Zero stops its effect but leaves the route assigned. |
| + | Moves upward from the value you set. |
| − | Moves downward from the value you set. |
| ± | Moves in both directions around the value you set. |
To delete a route, double-click its amount dial or click its × on the ROUTING page. To remove every route from a MOD, right-click its tab and choose Clear destinations.
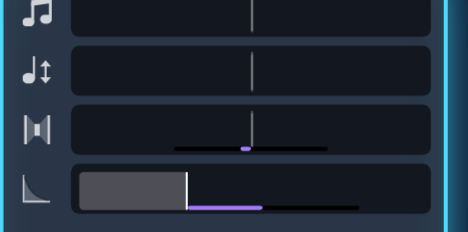
A modulated slider shows a range line for its reach and a coloured mark for its current value. The displayed reach also responds to the route's velocity influence.
Drawing shapes
- Drag a node to move it.
- Drag between nodes to bend the segment.
- Double-click to add a node.
- Alt-click a curve to straighten it.
- In Envelope mode, right-click a node to make it the sustain point.
Use the shape menu for starting points including Ramp, Saw, Triangle, Sine, Square, Pulse, Exp, Log, AD, ADSR, and Steps. Save custom shapes under MY SHAPES. They are stored on disk alongside your preset data.
| Mode | Playback |
|---|---|
| Trigger | Runs once for each note, using the shape's length. |
| Loop | Cycles continuously as an LFO. It can sync to tempo. |
| Envelope | Holds at the sustain node while the key is down, then plays the rest of the shape when you release the key. |
| One-shot | Plays through once, ignoring key release. |
MOD7 and MOD8 sources
| Note / Velocity | The played key and how hard you played it. Each voice reads its own values for per-voice destinations. |
| Mod Wheel / Pitch Wheel / Aftertouch | Controller values shared across the instrument. With MPE enabled, per-note pressure is available through Pressure. |
| Macro 1 to Macro 4 | The four knobs in the MACROS panel at the bottom left. |
| Pressure / Slide | Per-note pressure and Slide (CC74) in MPE mode. Enable MPE under ☰ › MPE (per-note expression). |
| P1 Ring–P8 Ring | A ramp falling from 1 to 0 over each plucker revolution. Each voice has its own ramps. Most useful at rhythmic rates. Higher rates produce increasingly coarse modulation. |
Macros
The four macro knobs do nothing until you give them a job. Pick Macro 1, 2, 3, or 4 as the source in a MOD7 or MOD8 slot, then choose a destination and amount. Give the same macro several slots and one knob moves several controls at once.
Click the name field beside a macro to label it. Its source name remains Macro 1–4 in the routing menus. Assigned macros light up and show their destination count.
Changing the whole pattern
Four destinations act on all eight pluckers or strings at once: Plucker Spread, String Spread, Plucker Random, and String Random. They sit under GLOBAL in the destination picker, and on the ROUTING page. Spread fans the positions apart. Random scatters them. Use these for timing changes across the whole set, or modulate individual string Positions for smaller changes.
Modulating another MOD
A MOD can control another MOD's rate or destination amounts. For example, use an envelope to fade in an LFO's effect. Drop the cable onto a MOD's rate field or numbered amount dial.
To reach another MOD's slots while dragging, pause over its tab until it opens, then continue to the target. A MOD cannot target itself.
The ROUTING page
Each row represents one route. Changes here also appear in the MOD panel.
| Source | The MOD or controller driving the route. Click to change it. |
| Destination | The control being moved. Click to choose another. Inactive or unavailable destinations appear dimmed and struck through. |
| Amount | Depth as a percentage. Drag sideways or right-click to type a value. |
| Polarity | Click to cycle +, −, and ±. |
| Velocity | How much note velocity scales the route's depth. Drag or right-click to enter a value. This is unavailable when the source is already Velocity. |
| × | Delete the route. |
Several sources can affect the same destination. For example, a macro can set the filter's opening while an envelope adds movement on each note.
Velocity per route
At 0%, the route's depth ignores velocity. At 100%, a soft note gets less modulation and a hard note gets the full amount. At 50%, a note played at half velocity gets three-quarters of the set depth.
Set this separately for each route. One MOD can open the filter more on hard notes while its vibrato route stays unchanged. Per-voice targets follow each note. Shared targets such as effects act on the combined sound.
7 · Amp and filters
The bottom-right panel has three tabs: AMP, FILTER 1, and FILTER 2.
AMP
| Attack / Decay / Sustain / Release | The amplitude envelope for each voice. Attack controls the fade-in, Decay moves toward the Sustain level, and Release controls the fade after you let go. |
| Vel | How much velocity affects strike strength. At zero, strike strength ignores velocity. Routes using Velocity can still change the sound. |
| Glide | Slides the pitch between notes in the two mono modes, Retrig and Legato. It does nothing in Poly. |
| Build | How quickly a bowed string swells. Zero is immediate. Higher values build more slowly. It does not set the release time or stop a stuck note. |
| Bend | The pitch-bend wheel's range above and below the played note. |
| Voices | The maximum held-note polyphony: 1, 4, 8, 12, or 16. More voices use more CPU. The mode menu offers Poly, Retrig, and Legato. |
The filter pair
Each voice has two filters. Click the dot on a filter tab to enable or bypass it without switching tabs. Both filters are off in INIT.
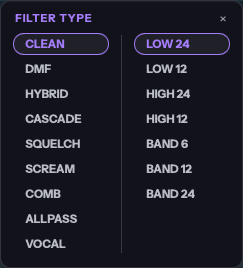
| TYPE | Opens a picker with the model on the left and its modes on the right. |
| FREQ | Filter cutoff. On Vocal, it shifts the vowel's frequencies. |
| RESO | Emphasises frequencies around the cutoff. Higher settings can ring or self-oscillate, depending on the model. |
| DRIVE | Pushes more signal into the filter for saturation. |
| CHAR | A model-specific character control. See the table below or hover over it for a description. |
| ROUTING | SERIAL sends filter 1 into filter 2. PARALLEL sends the voice into both and mixes their outputs. |
| WET / MIX | In SERIAL, WET blends the dry voice with the filtered signal. In PARALLEL, MIX balances filter 1 against filter 2. Each mode remembers its own setting. |
| Model | Sound and CHAR control |
|---|---|
| Clean | A neutral filter. CHAR tilts the sound darker or brighter. |
| DMF | A softer filter. CHAR adds warmth. |
| Hybrid | A four-pole ladder with two personalities. At low CHAR it is smooth and polite, with the resonance held in check. Turn CHAR up and it gets rawer and dirtier, the resonance bites harder and the low end fills out. Nothing switches over. It slides between the two. |
| Cascade | A warm four-pole ladder whose level holds steady as the resonance rises. CHAR bends the soft clipper inside the resonance loop, which rounds and thickens the sound. You hear it mostly with DRIVE up. |
| Squelch | The acid-style diode ladder. CHAR thins the bass inside the resonance loop, so the sound gets more nasal and grittier as you turn it up. |
| Scream | A resonant filter with the distortion built into its resonance. It starts screaming around seven tenths of RESO. CHAR hardens that distortion a little. It is a subtle control on this model. |
| Comb | A tuned echo with a metallic, hollow sound. CHAR controls damping. |
| Allpass | Phaser-like sweeps. CHAR spreads the stages. |
| Vocal | Vowel sounds. CHAR selects A, E, I, O, or U. |
Six models offer seven modes: Low 24, Low 12, High 24, High 12, Band 6, Band 12, and Band 24. The number describes the slope in dB per octave. Comb, Allpass, and Vocal have no mode selection.
The four main knobs accept modulation. Use a MOD in Envelope mode for a filter envelope. Changing the model or mode resets that filter, so it can interrupt a ringing sound.
8 · Effects
The EFFECTS page processes the combined output of the voices. Its ten units run from top to bottom in the order shown.
| Effect | What it does |
|---|---|
| Chorus | Thickens the sound with delayed, detuned copies. Choose 4, 8, 16, or 32 voices. Short delays thicken. Longer delays create more separation. |
| Compressor | Controls level changes. Choose Single band or Multiband and a VCA, FET, or Opto model. |
| Delay | Mono, Stereo, or Ping-pong repeats, with free or tempo-synced timing and a filter in the feedback path. The chosen filter determines how the repeats change. |
| Saturation | Tube, Tape, or Wavefolder distortion. Drive sets how hard the signal is pushed. The other controls change with the model. |
| Equalizer | A high-pass filter, a bell band, and a low-pass filter for shaping the output. |
| Filter | The same nine models and seven modes as the voice filters, applied to the combined sound. |
| Flanger | A short, swept delay with feedback for metallic sweeps. |
| Phaser | Sweeping notches for a rounder swirling effect. |
| Reverb | Room, Plate, Hall, or Cave spaces. Decay sets the tail, Pre Delay separates it from the original sound, Width sets the stereo spread, and Low Cut and High Cut shape its tone. Early sets the level of the first reflections. Diffuse smears them out. |
| Limiter | Reduces peaks. It starts last in INIT, but can be moved like any other effect. |
Effect controls
- Click the dot, name, or icon in a strip's header to enable or bypass it.
- Drag the nine-dot grip to reorder the chain.
- Drag the header's output-trim number vertically to change its level in dB. Shift-drag for fine adjustment, double-click for 0 dB. The lowest setting is silence.
- Use MIX to blend an effect with its input. Every effect except Equalizer has MIX.
- Drag a MOD tab onto a knob to modulate it.
Presets store effect settings and order. Loading a preset can enable or bypass the limiter, so check its state when you need peak control.
Limiter
The limiter reduces gain and rounds off remaining peaks with a ceiling curve. It has no look-ahead in this release.
| INPUT | Input gain in dB. Turn it clockwise for more gain and limiting. Double-click for 0 dB. |
| CEILING | The maximum level of the limited signal. |
| ATTACK | How quickly gain reduction responds. Slower settings let more of the transient reach the ceiling curve. |
| RELEASE | How quickly gain recovers. Fast settings can pump. Slower settings hold the reduction longer. |
| CHAR | How softly the ceiling rounds peaks. Higher settings soften more of the signal near the ceiling. |
| LINK | How much the channels share gain reduction. Full keeps their gain changes together. Zero lets each channel respond on its own. |
| MIX | Blends the limited signal with the unlimited input. |
| MODEL | Clean, Punch, Warm, or Crush. Changes the response from transparent limiting to more obvious pumping and saturation. |
The display shows the ceiling and limiter response, with live output and gain-reduction information while audio plays. Drag horizontally for Input or vertically for Ceiling.
INIT starts with the limiter on, Input at 0 dB, and Ceiling at −0.1 dB. The soft knee and ceiling curve can affect signals below the ceiling.
9 · Presets
Use PRESETS to browse and organise your library. The top-bar arrows step through the current folder while you stay on another page. SAVE lights up when the patch has changed.
A preset stores the instrument settings, including polyphony, modulation, and effects. INIT resets the sound to its starting settings.
Folders and Favorites
In Folders view, the left sidebar lists your banks and User folder:
- Banks: The factory bank and any other preset folders. This release adds Factory 0.9.03 as one list. Use tags to find instrument types within it.
- User: Your own presets and subfolders. SAVE can also update a factory preset after confirmation.
- All: Every preset in the library, alphabetically.
- Favorites: Every preset you have starred, from any folder.
Click the star on a preset row to add it to Favorites, or × to delete it. Deletion asks for confirmation. Hover over a row to see its folder. Drag the sidebar divider to resize it.
The factory bank is an ordinary folder of preset files. You can edit or delete its presets. Deleted presets stay deleted. New releases add their own factory folder alongside older banks and may offer to remove the old one.
Instrument badges
A coloured badge beside each name shows its instrument tags. A preset can have more than one: the badge uses the first tag's letters and a colour band for each. Hover to read them all. An unclassified preset has a dim badge.
| Family | Instrument tags |
|---|---|
| Low | Bass (BAS), Synth Bass (SBS) |
| Melodic | Lead (LED), Keys (KEY), Organ (ORG), Sequence (SEQ), Synth (SYN) |
| Plucked | Pluck (PLK), Guitar (GTR), Strings (STR) |
| Tuned | Bell (BEL), Mallets (MAL) |
| Percussion | Drums (DRM), Percussion (PRC) |
| Blown | Brass (BRS), Reed (RED), Wind (WND), Vocal (VOX) |
| Sustained | Pad (PAD), Atmospheres (ATM), Texture (TEX), Drone (DRN) |
| Other | FX (SFX) |
Editing and filtering tags
The tag panel has four collapsible groups:
| INSTRUMENT | The instrument types listed above. |
| TONE | Bright, Dark, Warm, Metallic, Glassy, Wooden, Hollow, Airy, Full, Thin, Harsh, Noisy. |
| CHARACTER | Clean, Gritty, Soft, Aggressive, Delicate, Organic, Synthetic, Evolving, Ambient, Wide, Lo-fi, Experimental. |
| ARTICULATION | Plucked, Struck, Bowed, Blown, Sustained, Staccato, Percussive, Rhythmic, Swelling, Gated. |
In Folders view, clicking a tag adds it to or removes it from the open preset. In Tags view, the same buttons filter the whole library. Choose two tags to find presets carrying both.
Filtering also offers UNTAGGED and DESIGNER. Select two designers to see presets by either. Tags outside the built-in list appear under OTHER, where you can remove them.
Name, Designer, and Save To
| Name | Click to edit. You can also drag this field onto a folder to move the preset. |
| Designer | Enter the preset author's name. It is stored in the file and appears in the Designer filter. |
| Save To | Shows where SAVE will write. For your own presets, edit the subfolder after User/. Leave it empty for the main User folder. On a factory preset, this field shows its factory folder and cannot be edited. |
Making folders
Drag a preset onto + New Folder and enter a folder name. You can also click + New Folder to choose a destination for your next save. A new folder appears in the sidebar once a preset has been saved or moved into it.
Typing Live Set/Opener in the Name field sets the folder to Live Set and the preset name to Opener. Slashes in folder names create deeper folders.
Saving and renaming
Saving changes to the same user preset replaces that file without a prompt. Other cases ask you to choose:
| Situation | Options |
|---|---|
| The name is already in use | Save as copy keeps both files and adds a number to yours. Replace overwrites the existing file. |
| You changed a user preset's name | Save As… saves the edited patch under the new name and keeps the original. Rename changes the existing file's name. |
| You save over a factory preset | Update factory replaces that factory file. Save to User saves your version separately and keeps the factory copy. |
Closing a save question cancels the operation. Pressing Enter selects its default choice.
10 · Menu and appearance
Open the ☰ menu at the top left for these actions:
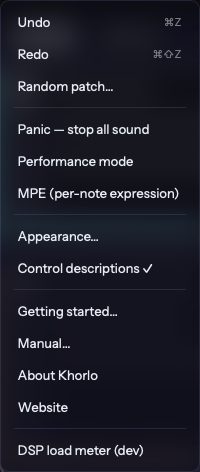
| Undo / Redo | Undo or restore edits. |
| Random patch… | Create a new patch. Tame stays playable and musical. Wild can reach anything. Either can keep the current strings and randomise only the pluckers. Undo restores the previous patch. |
| Panic | Stop every voice and every effect tail right now. Use this for stuck notes or runaway feedback. |
| Performance mode | Freeze the animated background, reduce shading, and stop live modulation from animating the cylinder. |
| MPE (per-note expression) | Enable per-note pressure and Slide. This setting is saved with the patch. |
| Appearance… | Set the window size, colours, and 3D appearance. |
| Control descriptions | Show control help in the preset-name area on hover. Enabled by default. |
| Getting started… | Run the introductory tour again. |
| Manual… | Open the manual. |
| About Khorlo / Website | Which build you have, and the JAS-I website. |
| DSP load meter (dev) | Show audio-processing load for troubleshooting. |
Window size
The Appearance panel floats over the instrument. Drag its title bar to move it. Choose a size button or drag the plugin window's corner:
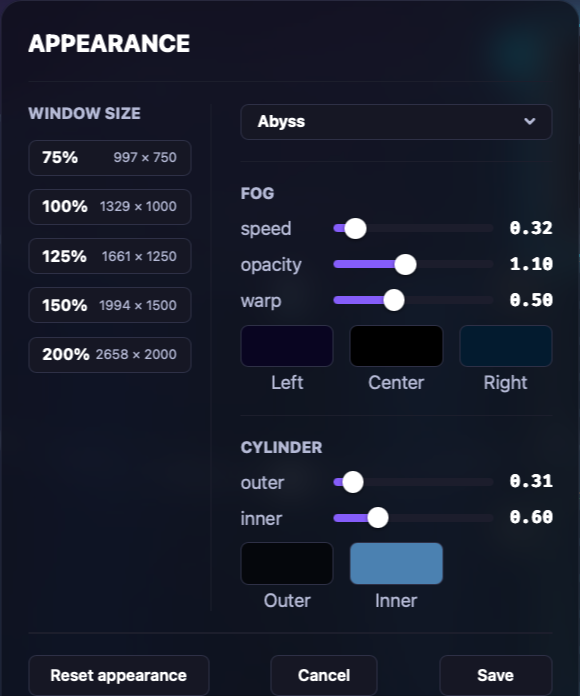
| Size | Pixels |
|---|---|
| 75% | 997 × 750 |
| 100% | 1329 × 1000 |
| 125% | 1661 × 1250 |
| 150% | 1994 × 1500 |
| 200% | 2658 × 2000 |
Your DAW saves the window size with the session. Presets don't store it.
Colour schemes
Ten schemes ship with Khorlo, from Abyss and Darkness through Ember, Verdigris and Forest and Venom to Halo, the light one. The same menu lets you save your own schemes and delete the ones you don't want.
Below the scheme menu, FOG sets the speed, opacity and warp of the moving background and its three colours, Left, Center and Right. Those three also light the cylinder from those sides, so the glass takes on the colours you choose. CYLINDER sets the outer glass and the inner glow, each with a strength slider and a colour. Save keeps your changes and Cancel puts them back. Reset appearance restores the original look without changing the window size. Appearance settings are remembered separately from the sound.
11 · Keyboard shortcuts
Your DAW keeps the computer keyboard for notes and transport. Send MIDI to play Khorlo. Inside a DAW these keys reach Khorlo:
| Keys | Action |
|---|---|
| ⌘Z / Ctrl+Z | Undo. |
| ⌘⇧Z / Ctrl+Shift+Z | Redo. |
| Up / Down on PRESETS | Load the previous or next preset. |
| Left / Right on PRESETS | Move one column across the list. |
| Home / End on PRESETS | Load the first or last preset. |
A few more work whenever Khorlo has the keyboard, which a DAW rarely allows: 1–6 selects a plucker and Shift + 1–6 a string, [ and ] step through the MODs, the arrow keys nudge the last control you touched (Shift for a finer step) or move selected envelope nodes up and down by 1% (Shift for 10%), and Esc closes a menu or clears the node selection.
12 · If something sounds wrong
| Problem | Try this |
|---|---|
| No sound | Send a MIDI note. Check that a plucker and string are enabled, that the plucker's numbered buttons include that string, and that string Level and master volume are up. Check AMP settings and effect output trims too. |
| A stuck note or runaway sound | Choose ☰ › Panic. It stops every voice and effect tail right away. |
| The tail is too long | Shorten AMP Release or string Decay. Check delay feedback and reverb decay. For unwanted sustain while holding a note, lower plucker Rate. |
| A MOD does nothing | Check its destination and Amount. Make sure the target is enabled and has room to move. Envelope mode needs a note, and source MODs need input from the selected controller. |
| Spread does nothing | Raise Coupling to add the second resonating body. Very low non-string resonators may omit that body to reduce processing cost. |
| A filter does nothing | Enable its tab's dot. In SERIAL, check WET. In PARALLEL, check the balance between the two filters. |
| One plucker is silent | Check its on/off state, Strength, and numbered string buttons. The selected strings must also be enabled and have audible Levels. |
| Changing resonator type does nothing | Play a new note. Existing notes keep their original resonator type. |
| Hard notes start sharp | Lower string Drive to reduce the pitch bend on strong attacks. This effect applies to the String resonator. |
| Chords sound muddy | Try less Coupling, shorter Decay, or different Pan positions. Lower individual string Levels to balance the chord. |
| CPU use is high | Reduce AMP Voices or string Coupling. Bypass unused effects. For a slow interface, enable Performance mode. |